background

Saturday, October 25, 2014

Zombie Themed Party


With the recent start of the new season of Walking Dead, we decided to throw a premier party with some friends. I put together a fun spread of zombie themed finger foods and we asked our guests to dress as one of the characters from the series. It turned out great and the premier was a thriller!


Here are a few fun ideas if you need have a Halloween party or office potluck coming up this week. Hope you enjoy!


Moldy Cheeseball


This is a fast way to add a little Halloween flair. Make your favorite cheeseball recipe, or even pick up one from the store. Roll it in green herbs to give it a moldy look. I used parsley flakes so the flavor would not distract from the flavor of the cheese. Serve with crackers or veggie sticks and decorate the plate with plastic spiders or insects to add to the effect.

Cured Epidermis


Create an eerie display with these cured pieces of proscuitto. I found this idea from Martha Stewart. The result is a jerky-like meat with a great salty flavor. 

Preheat your oven to 400 degrees. Lay slices of proscuitto - mine were about 1/4 inch thick - in a single layer on a foil lined baking sheet. Bake for 15-20 minutes until stiff and crispy, turning over once.

Line another baking sheet with paper towels. Set wire cooling rack over paper towels. Remove slices from oven and transfer to cooling rack to drain grease.

Serve on a tray or plate with a butcher knife for extra spooky effect.

Bloodshot Eyeballs


This is a simple option for a creepy party food. Prepare deviled eggs as you normally would. Use a slice of green olives with pimento for the pupils. Dip a toothpick in red food coloring and draw lines to create bloodshot veins.

Intestine Sausages


Warm cocktail sausages on low heat in a crockpot. Serve with a side of BBQ sauce or spicy mustard.

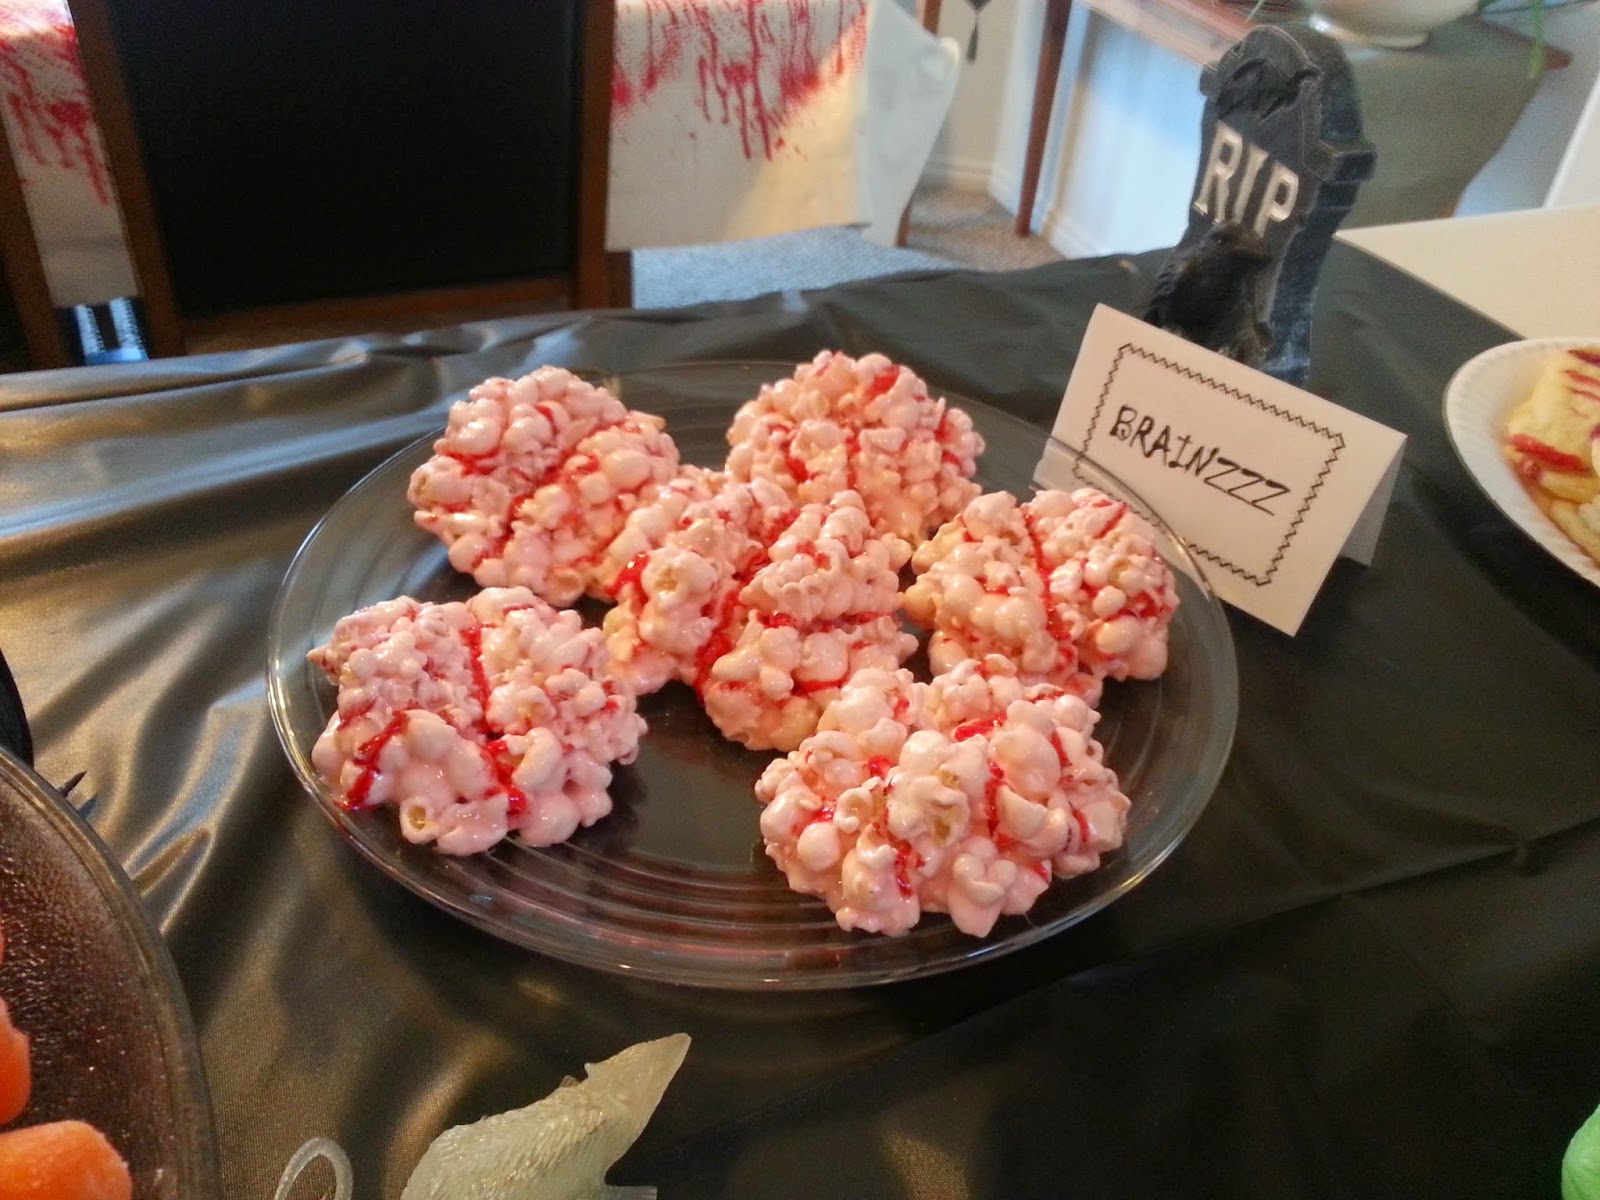
Zombie Brain Popcorn Balls


This is a recipe I posted last year. These are so fun and always impress. You can find the recipe and instructions here.

Zombie Fingers


These are yummy shortbread cookies made to look like zombie fingers. By adding a couple drops of green food coloring to your cookie dough, you could make witch's fingers instead. I adapted my recipe from one I found on Food.com

Ingredients:
1 large egg + 1 egg white
1/4 teaspoon vanilla
1/4  cup butter, at room temperature
1/4 cup powdered sugar
2-1/2 Tablespoons granulated sugar
pinch of salt
3/4 cup flour
18-20 pecan pieces or blanched almonds
red food coloring
green food coloring

Directions:
Preheat your oven to 350 degrees. Spray a large baking sheet with non-stick spray. In small bowl, whisk together 1 whole egg and vanilla. Set aside. 

In large mixing bowl, combine butter, powdered sugar, granulated sugar and salt. Mix with hand mixer (or paddle attachment of electric mixer) on medium speed until well combined. Add egg/vanilla mixture and beat until smooth, about 2 minutes. Add the flour and mix on low speed until just incorporated. Wrap the dough in plastic and chill for 20-30 minutes, until firm.

Working with rounded tablespoons of dough, roll each piece on a floured surface into a finger shape, 3-4 inched long. The dough will expand when cooked, so make your fingers skinnier than you want them to be. Pinch the dough in 2 places to form knuckles. Make them large and uneven for a creepier look. Score each knuckle lightly 3 times with a small knife. Place on prepared baking sheet, allowing room for expansion between fingers. Repeat process until all dough is used. Should make 18-20 cookies. 

In small bowl, beat 1 egg white with 2 drops of green food coloring. Lightly brush all cookies with egg white mixture. Press pecans onto end of each finger to form finger nails. Using a small paint brush dipped in red food coloring, brush around the "cuticle" of each nail to create a bloody effect.

Bake until lightly browned and firm - about 12 minutes. Allow to cool completely before serving.

Eyeball Juice


I found some plastic eyeballs at a Halloween store. After running them through the dishwasher, I added them to grape flavored Crystal Light to create a spooky looking punch. 


These were all fast and easy recipes, but the result was a fantastic looking spread of creepy food. Putting it all together was so fun and I hope something here has sparked an idea for you and your upcoming Halloween events!

Saturday, October 26, 2013

Lemon Bars

I am lucky enough to work for an extraordinary boss and company, so with Bosses Day hitting last week I wanted to make sure I acknowledged by boss with a treat that I know she likes. I had never made lemon bars before, but after looking around for some tips and recipe reviews, I tailored this to be what I think is the perfect ratio of sweetness, tart lemon flavor and buttery crust.

As a note, I only used a small amount of powdered sugar on the top. While I love the touch of powdered sugar, when eating treats topped with the stuff I somehow always manage to inhale or exhale at exactly the wrong moment and end up covering myself with sugar or choking on it. So, for the sake of keeping these low maintenance to eat I kept the sugar minimal. You could obviously adjust this to match your personal taste.

Lemon Bars

Crust
1 c butter, softened
2 c flour
1/2 c sugar
pinch of salt

Filling
3 c sugar
1/2 c + 2 T flour
1 1/4 c fresh lemon juice (approx 5-6 large lemons or 7-8 small lemons)
zest from 2 lemons
8 eggs

powdered sugar to top (optional)

Preheat oven to 350 degrees. Use pastry cutter or just your hands to blend together all crust ingredients in medium bowl. Press into greased 9x13 pan. Bake for 20 minutes. Set aside to cool slightly while preparing the filling.

Whisk filling ingredients together in medium bowl until well combined. Pour over crust. Bake for an additional 30 minutes. Allow to cool in pan.

Sprinkle with powdered sugar to taste while still slightly warm. Once cool, cut into squares and serve.


Tuesday, October 15, 2013

Zombie Brain Popcorn Balls

We are somewhat infatuated with zombies at our house. So with the recent season of The Walking Dead starting, some friends invited us over to watch the premier. It only felt right to bring a zombie-related treat. These popcorn brains were fairly easy to make (just a little messy) and they turned out pretty fun. This would be a great option to take to any Halloween party or potluck with relatively low cost and low time commitment.


Popcorn Brains
6 cups popcorn, popped and lightly salted
1 bag (10 oz) mini-marshmallows
3 T butter
1/4 t vanilla
red food coloring
small paintbrush

In large saucepan, melt the butter and marshmallows over med-low heat, stirring regularly. This process may take 5-10 minutes, but if you rush the marshmallow melting, your popcorn balls will turn out hard. Once melted, add vanilla and 2 drops of food coloring and stir until color is distributed. Stir in popcorn until evenly coated.

Form popcorn into tennis ball sized balls. This is the part that can be kind of messy. I attempted to do this with my hands using some butter to grease my fingers, but the mixture was way too sticky and would not bind together but rather just stuck to my fingers. My solution was to take a square of wax paper, spray it with non-stick spray, spoon the popcorn into the center and use the wax paper to form around the popcorn ball. Then I carefully peeled back the wax paper to release the popcorn ball.

You will want to form these into a somewhat flattened ball so they more resemble a brain shape. After forming a ball in the wax paper, I squished the ball slightly and pressed down along the center to create a minor valley between the brain hemispheres. This is the line where you will later paint your major dividing vein. Set the finished brains aside on another clean piece of wax paper to cool.

After forming all the brains, use a paint brush and food coloring to paint the major vein down the middle of the brain and then as many side veins as you want for effect. Mmmmm....BRAINNNZZZZ!


Wednesday, May 8, 2013

Homemade Sugar Scrub


Have you ever used a sugar scrub? It just sounds lavish (and fattening). But it really is a little something extra that makes you feel good. Every time I use one, I vow that I will make it a regular part of my routine. Now that I know how simple it is to make your own, with ingredients already on hand, there really is no excuse.

I made this as a Mother's Day gift for our moms as well as the step-daughters. This would also be an easy and fun gift for any occasion; baby showers, bridal showers, birthdays, etc. You can easily change up the scent to make it more seasonal as well. I used orange since we already had a bottle. 

I bought my jars at Walmart and then used Mod Podge to apply scrapbook paper and labels to the front and top. Make sure you go slightly beyond the edges of the paper so you get better adherence to the glass. I finished it off with some twine and a cute button just for presentation, but this would be easy to customize to whatever your taste or occasion.

Homemade Sugar Scrub
3 cups white sugar
1 cup olive oil (you could also use almond oil)
20-30 drops essential oil (for fragrance)
Glass jars with lids


In medium mixing bowl, mix sugar and olive oil until evenly moistened. Add drops of essential oil to create desired fragrance. Spoon into jars. My jars were 10 ounces each and this recipe filled 3 jars. 


Cute, easy gift idea for any deserving women in your life. Or great to just make for yourself to have on hand. This is a great exfoliator to use on hands and feet as we go into summer. Perfect to help get your skin ready and glowing for the season.

Tuesday, April 30, 2013

Sandal Season


So the weather this weekend was beautiful! We spent a lot of time outside working in the yard, bathing the dogs and enjoying the sun. Besides being a great reminder that I had vowed to be in perfect shorts-friendly shape by this time (whoops!) it is also the beginning of sandal season! 


Ladies, one of the great things about being a woman is the opportunity to enjoy pretty things and celebrate our femininity. No, I'm not saying you HAVE to be all dolled up in order to be considered a successful woman. I am not making a statement on feminism or equality here. I am simply saying that it is totally appropriate to celebrate what it means to be a woman. With fun, sassy sandals from flip flops to espadrilles to heels, you can make a great fashion statement. However, if you plan on busting out those toes, let's take a moment to prepare. A cute shoe is completely trumped and defeated by gnarly toes, chipped polish and cracking heels. If your heels look like a pumice stone, it doesn't matter how cute your shoes are. That is all that will be drawing people's eyes. It's like a train wreck...you want to look away, but you just can't.  Your feet have been hiding inside thick socks and tall boots for months. Here are a few basic tips to helping them make an impressive debut:

  • Exfoliate! Use a foot scrub to help remove dry skin. (Here is an easy homemade sugar scrub that works great.) These exfoliator creams can be used on legs and hands as well for extra soft skin. Use a pumice stone or foot file to work over rough or callused spots like the heel and ball of the foot. 
  • Moisturize! Your feet need moisture to help keep them looking and feeling fresh. The best time to do this is right before bed so you get the advantage of the moisturizers working while you are sleeping. I recommend using a cream or shea butter rather than a lotion. These options are much more concentrated to help keep your natural body moisture in rather than just evaporating like a thin lotion will. One I have found that I like is Cetaphil. You can buy this by the tub as Costco which makes it cost effective. It is a great moisturizer for your whole body.
  • Groom! Keeping your toenails shaped is important. After showering (so the nails are softer) trim nails straight across the toe, then snip corners at a 45 degree angle. Nails should not extend past the toe itself. Use a file to round the sharp corners slightly to avoid ingrown toenails.
  • Express Yourself! Pick a color that is fun and bright. Use a base coat prior to applying the polish in order to avoid yellowing your nail beds. If you do find your nail beds a bit discolored, try rubbing them with a lemon wedge for a minute. The lemon juice is said to contain oxidizing agents that can help brighten your nails.

And finally...let go of your beliefs that your feet are weird. All feet are weird. If you are taking care of yourself and putting just a little effort into presenting them at their best, you can wear those strappy sandals with pride. As a teenager I was embarrassed of my short toes. I remember going to Lake Powell with my high school friends and actually being self conscious about people seeing my feet. I would cover them with a towel on the boat. Now I love that they give me an opportunity to express some fun and color. Your feet take you everywhere. They have put in thousands of miles for you. Treat them right and then show them off!


photo credit: pumpkincat210 via photopin cc

Saturday, April 20, 2013

Easter Brunch


Every Easter we host a dinner with lamb roast and homemade mint jelly. We didn't want to miss the opportunity to have the family over, but this year we wanted to try something different so we opted for a brunch instead. I made 2 frittatas, a beautiful fruit salad, some virgin mimosas and oven-cooked bacon (because everything is better with bacon).
All of these recipes were easy to put together and perfect for feeding a larger group. We kept it fairly Primal (grain & sugar free), but for those of you still loving your bread, this recipe for Stuffed French Toast would be a great addition as well.
Click below for each of the recipes.


Cooking Bacon in the Oven


Who doesn't love bacon? It is definitely a crowd pleaser, but can be tough to prepare in larger quantities. Last Christmas I tried preparing it in the oven and it worked beautifully, so I went with that method again for Easter. It is a lot less maintenance to prepare and much easier to make for a large group. Plus, when you are done, you can just discard the foil & grease. Easy clean up.

Oven-Cooked Bacon


Preheat oven to 400 degrees. Line baking sheets with foil and turn up edges slightly to help keep grease inside the pan. Lay bacon out flat on foil, not touching. Bake on middle rack for 18-25 minutes. Time will vary based on how thick your bacon is and how close together the pieces are. Just keep an eye on it. When it looks "done", it is. Remove from oven and let sit for 5 minutes. Transfer to paper towel to drain. Serve.

Non-alcoholic "Mimosas"


Simple way to liven up your orange juice for a party or gathering. Add berries for extra color and serve in champagne flutes.

Virgin "Mimosas"


2 (2-liter) bottles of Sprite Zero
1 gallon orange juice
2 cups pineapple juice
berries for garnish (optional)

Combine all ingredients in drink server or punch bowl. This was a fun way to have a special drink without too much fuss or extra sugar. If you make the Honey-Poppy Seed Fruit Salad, just use the pineapple juice you saved from draining the cans. We put blackberries, raspberries and sliced strawberries in this for color.
Serves 20

Honey Poppy-Seed Fruit Salad


This delicious fruit salad makes for a beautiful presentation. Throw this together right before your next gathering. The colors and flavors are a great addition to any tablescape.

Honey-Drizzled Fruit Salad


2 (20 oz) cans pineapple chunks in real juice
7-8 ripe kiwi, peeled, sliced and cut in half (to make half-circles)
3 cans mandarin oranges, drained well
3 cups strawberries, quartered
Approx. 3-4 T raw natural honey
poppy seeds

Drain pineapple chunks well (reserve the juice if you are planning on making "Mimosas"). Combine all fruit in large bowl. Lightly drizzle honey over fruit and stir to evenly coat. Sprinkle with poppy seeds as desired and stir again.
This salad stays beautiful for a couple hours, but then starts to "blend" colors. Best to make and serve immediately.
Serves 12-15

Easy Frittata


This is an easy recipe and perfect for customizing to whatever your tastes are as far as ingredients. Use this same basic recipe but try it with ham, bacon, cheddar, mozzarella, broccoli, peppers, etc. Simple and fast way to feed a larger group.

Sausage, Spinach & Pepperjack Frittata


1 lb spicy ground sausage
1 medium onion, chopped
1 1/2 cups shredded pepperjack cheese
1 pkg (16 oz) frozen chopped spinach, thawed and excess water squeezed out
14 eggs
1/2 cup milk
salt & pepper

Preheat oven to 400 degrees. Grease a 9x13 pyrex baking dish.
In a skillet over medium heat, cook the onion and sausage until meat is no longer pink. Remove from heat and stir in the drained spinach.
Spread 1 cup of cheese in the bottom of baking dish. Layer meat mixture over the cheese. In large bowl, scramble eggs and milk. Season eggs with salt and pepper. Pour eggs over meat mixture and cheese. Do not mix or stir contents of baking dish. Sprinkle remaining cheese on top.
Bake uncovered for 30 minutes, or until eggs are no longer runny and top is lightly browned. Cut into squares.

For variety, just change your layers using any type of meat, cheese and veggies that you want. I also made a ham and cheddar frittata using diced ham and sharp cheddar cheese.
Serves 12